
Another favorite method to use for preparing quilted artwork to display in galleries is to mount the work on fabric-wrapped, stretched canvas surfaces which can be purchased at any art supply dealer, locally or on line. Stretched canvases are made in a variety of sizes and shapes, square, rectangular and even circular. For wrapping a stretched canvas select the size and profile desired to mount and display the quilted art work. The choices for profiles (depth of canvas) are 3/4”, a typical profile; or, one can choose a 1 3/8” Gallery profile or a 2 3/8” Museum profile.
To wrap a stretched canvas with fabric, the additional supplies needed are: staple gun with 1/4” staples, background fabric to coordinate with the artwork, a finished quilted piece, eye screws and picture wire.

I like using a 9”x 9” square canvas with a Museum profile because I like depth the mounted work projects from the wall after it is hung. A 7” square pictorial (with a 1” background margin around four sides) centers nicely on the covered canvas. For groupings such as above, I use the same batik fabric to cover all 8 canvases, and varied the finished theme-related artwork that were stitched on top. Each one one sold.
The method for making the fabric wrap is straightforward and is easily accomplished after practicing with one or two stretched canvases.

9" + profile dimension (2½") doubled (5") + 1½" doubled (3") to cover the stretcher bars on the back = 17" square. 9" + 5" + 3" = 17" square of fabric to be cut to be wrapped around the stretched canvas.

First: The finished artwork is centered on the right side square of background fabric chosen. With a sewing machine, stitched the artwork onto the fabric square using a stitch-in-the-ditch along the inside edge of the binding.
 |
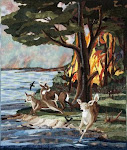
| Double Trouble, 9" x 9" |
Secondly, lay this onto the top of the canvas making sure everything is centered and carefully begin wrapping two opposite edges around the canvas. Holding it flip the canvas over and begin stapling the raw edges along the back. Start stapling in the center of one side and gently pull the work across to be stapled on the opposite side center. It does not have to be stretch super tight. Be gentle.

Fold the excess at the corners like a miter and tuck them underneath before flapping the remaining two edges and stapling them in place. Staple along the edges to hold firmly.
The final step is to place two eye screws inside the stretcher bars so that when strung with framing wire, the piece will lay flat against the wall when hung in place.


.jpg)


