Sunday, October 11, 2009

The Alliance for American Quilts

This past week I was honored to be interviewed for the project called, "S.O.S.–Save Our Stories: The Alliance for American Quilts. I was interviewed by Karen Musgrave who asked me to share a photo of my quilt, Prairie Thunder, for the archives, and to discuss my work: what inspires me, what is my creative process for making my textile artwork, how did I become interested in quilts and other personal insights. I was also asked to provide my views on other quilt-related topics, such as the meaning of quiltmaking in women's history.


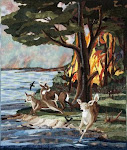
Prairie Thunder, 67" x 54" (in a private collection)

Knowing that I am one among 1,000 participants-to-date in this program, I was highly complimented by the invitation and thoroughly enjoyed the opportunity. To realize that my words and my voice have been archived for use by people conducting research, and I suppose, by those who may be curious, is a humbling thought. I am grateful.

Thursday, September 24, 2009

Anticipation


With the swing of the weathervane, the recent winds have been coming from the North, which means cooler temperatures. These refreshing temperatures have fired up my energy for tackling the laundry list of ideas I have been accumulating all summer. I’ve completed a series of small works and will post them another day.

Today, however, I am very excited anticipating the International Quilt Festival in Houston next month. I have received the magic phone call telling me that Firestorm has received an award, but I won’t know the details until October 13th.

Monday, September 7, 2009

End of Summer Road Trips

Lately, I have been on the road providing lectures and workshops to quilting guilds. It’s an activity I truly enjoy because I get to connect with quilters of all age groups, level of expertise, and favored style of quiltmaking. It never fails to inspire me to associate with people who love to play with fabric to create wonderful textile art and are willing to share most everything with one another. I always learn so much from other quilters and am grateful for being able to meet each and every one.

As a reward for getting through this summer heat, I’ll jump in my car again and drive to Santa Fe for my annual renewal of creative zing that only the rarefied air of New Mexico’s capital can provide. I always find great subject matter for my quilted art, such as, Santa Fe, #304.

Friday, August 7, 2009

Garden Influences

There’s a full moon now but like the summer days it will soon begin to wane, although the high heat remains unrelenting. I don’t believe I can fault the full moon for my lack of energetic activity in my studio, but I am able to blame my inertia to the depressing heat, 101° F. today.

It doesn’t really matter for there will be a ‘dance of the moonflowers’ in my garden tonight. I noticed the two bushes are once more loaded with buds that are promising to pop open after dark to fill the air with wonderful scent. The full moon will spotlight the blooms. It’s always a fun little festival when this occurs.

I understand why this flower was among Georgia O’Keeffe’s favorites. It’s just a wild weed, but the plants provide endless pleasure and have inspired one of my favorite wall hangings.
Moonflowers at Midnight
42" × 35 " ©Carol Ann Sinnreich

Tuesday, July 28, 2009

Dog Days Dominate

In the last posting I wrote about the spectacular thunderstorms, which added wonderful shades of lively spring colors to the visual appeal of the prairie. It was incredibly exciting to drive over a hilltop and witness rolling greenness under a brilliant blue canopy. The open sky is what I love about this part of the USA.

In all fairness, the summer in SW Oklahoma as well as in Texas has been brutal with weeks of triple-digit temperatures and little rain. The ranchers are taking another hit with dried up pastures and low water levels in ponds for their livestock. The temperatures have forced me to hide indoors embracing the air conditioning vents and thanking Willis Carrier for being so clever. The dog days of summer trigger sympathy for the polar bears as they wait for the returning ice floes to provide relief.
During the last brutal blast of summer heat in 1998, I designed a landscape to acknowledge what was happening out there on the prairie day and night, and in church on Sunday mornings.
The scenario is repeated this year as
in Summer Prayers,
©Carol Ann Sinnreich.

Thursday, June 11, 2009

Springtime on the Prairie

Recently, waves of bold thunderstorms have crossed the Oklahoma’s prairie anointing the winter parched earth with much needed rains. Unfortunately, the timing of these spring storms have been either too late for the ranchers, or in time to disturb the wheat harvesting. And yet, happily the lakes are now brimming, the waving prairie grasses are green, the brightly colored wildflowers are abundant and, for the time being, the prairie and its animals are no longer thirsting for water. All is verdant and lush, the birds are singing and new animal babies are frolicking for the fun of it. It’s a great deal more appealing than anticipating the prairie fires, which may occur in the drier months ahead.


Visually for the artist in me, this new season is a joy to witness particularly since I spent much of the late winter finishing my newest work, Firestorm. I have been focused on the power, the heat, and total devastation of a forest fire, its impact on frantic animals seeking refuge in a lake, and trying to recreate with fabric a pictorial representation of it all.
Firestorm, 51" w × 61" l
©Carol Ann Sinnreich, 2009


Tuesday, April 14, 2009

Backbone of My Work

I am frequently inspired by my Oklahoma environment as well as by the histories I read. Today as I walked with my dog down a dirt road around an isolated reservoir I was enchanted by the wispy white clouds in the cerulean sky, the bright sunshine, the bold breezes swirling the dried grasses and the tree thickets spouting green lace in their crowns. I love my time on the prairie because the structure of the earth is so obvious and appealing for me. My dog thinks it’s great, too.

On these walks it is not unusual to flush wildlife. Today it was a covey of quail. Yesterday it was white tail deer. Sometimes it’s a flock of wild turkeys. We’ve even caused rooting wild pigs to scatter and that was a bit exciting. I never know what I’ll see and am always delighted because these sightings enter my imagination, stay there and begin to formulate images to incorporate into my pictorials.

The one thing I can do well is draw. I believe that drawing is the backbone of good artwork. I make many sketches as I work out an idea. As I focus on the one that will produce a final composition, I will work harder on capturing the details. It’s not wasted time because these drawings familiarize me with my subject and helps me anticipate where I will have challenges when translating the composition into a fabric representation.

That deer from the other day has been added to my current work. I have a knack for being able to turn an animal around and draw it from any direction. The deer was leaping away from me, but in this piece, the doe is running at the viewer. Here is the master drawing I am using to assemble the deer.

Wednesday, March 18, 2009

Photo Morgue

During the development of a new design, I rely upon my drawing skills and art experiences to establish the integrity of an idea, a new design. Accuracy of details is important to me. I maintain a variety of reference materials to assist the effort: anatomy books, historical photos as well as a wealth of digital images I have taken, plus postcards, and clippings from magazines and newspapers.

Many artists keep a photo morgue, which is a collection of ephemera. My collection is carefully filed in four file boxes. My computer organizes my digital images and I do make CD copies of my photos. And lastly, books, I buy lots of reference books.

I can’t possibly have instant recall about body movement of people or animals, nor remember what period clothing looks like. I rely upon my photo morgue and other references to assist me with details. However, I do not copy directly from any source. That would be an infringement upon another person’s copyrighted creative effort. I am emphatically diligent about respecting Copyrights.

Friday, February 13, 2009

Ideas & Research

Where do I find my ideas for my work? Firstly, as a child my imagination was fueled by Walt Disney animated films. In my mind, the occasional scampering mouse in my home is wearing a little sweater and cap; his name is always Ben. The incredible Disney artists of those early films introduced me to drawing and creative ideas. Art school and life's experiences refined my approach and technique.

My imagination is always the starting point. I live in Oklahoma. People, open sky-vistas and history of the old American west surround me and make me pause to consider possibilities. I love reading 19th century histories and diaries, which does spark many ideas. Also, hiking at the nearby wildlife refuge allows me to see deer, coyotes, elk, bison, long horns, and, yes, hawks making lazy circles in the sky. These critters prove to be equally fascinating and subjects for my textile art. I carry a sketchbook and a camera.

"No Time To Waste" began with reading a brief history of the Pony Express. Immediately I started hearing the drumming of hoof beats, then I "saw" the distant rider gaining size as he approached the station. Soon the dogs started barking to announce his approach; then, the waiting riders began to shout while rounding up fresh horses. This image in my mind started swelling and took shape with many rough sketches until I found the tableau I wish to prepare. If I don’t "see" and "hear" an idea in my head, a design will hardly blossom.

If I am portraying an era, I believe the details must be as accurate as possible. I do research by looking at period clothing, tack, and other items at a local museum, which permits me access to their collections. The staff also allows me use of their extensive library, where I study old catalogs and other reference materials. And, yes, I have assembled home library of references.

Sunday, February 1, 2009

Padded Hangers & Hanging Bags

I prefer hanging my large bed quilts in a closet rather than wrapping each on a tube. I am equally meticulous about the hangers as I am with the tubes I use for rolled quilts. I bought my heavy-duty wire, blanket hangers from the dry cleaners. These inexpensive hangers came with a thick cardboard roller attached. Each hanger can adequately hold the weight of a large quilt with no sagging. Metal hangers may corrode; adaptations had to be made to protect the textiles.

As with plain tubes, I wrap the roller on the hanger with aluminum foil, then apply strips of batting to pad the roller. I wrap the batting up the sides of the hanger to provide a barrier between the wire and the hanging textile. The batting strips are anchored in place with basting thread and large stitches. Wrapping the batting roll with pre-washed muslin is optional. The hanger is ready for the quilt.

I recycle projects that never made it into a show or simply lost their appeal into Hanging Bags to cover quilts or special clothing. Of course, one can make a "plain jane" bag from muslin but that’s boring. A plastic dry cleaner bag* can serve as a pattern, or, you can make a paper pattern by outlining the shape of the hanger shoulders. Be sure to add enough allowance to avoid the finished bag from being too snug to slide over the quilt on its hanger. I add a hanging tag to the bag for identification purposes.
*Please don't use plastic bags to cover textiles. Plastic retains moisture and could cause mildew.

Saturday, January 31, 2009

Quilt Storage Tubes


As a consequence of volunteering at my local museum and working with its quilt collection, I like to roll my quilts on cardboard tubes that have been prepared following museum guidelines.

I glean hard cardboard tubes from a local fabric store or carpet outlet. For smaller quilts, use the tubes from waxed paper or plastic food wrap. The first step is to wrap the tube with aluminum foil because the foil serves to trap and contain any gases emitting from the cardboard. After wrapping, tuck the foil into the tube ends to hold in place. Follow by covering the foil with leftover batting to pad the tube.

Pre-washed muslin is used to cover the padded tubing. I quickly hand sew a seam using an overcast stitch, the length of the tube to secure the muslin covering. Others like to use a strip of fusible to close this seam, but I’m concerned with the fusible breaking down causing the sticking chemical to permeate the muslin covering and contaminate the quilt. Simple cloth ties are used to hold the rolled quilt in place. A long cloth bag is constructed into which the rolled quilt is slipped. And, yes, I store more than one quilt on a tube.

To aid the quick identification of quilts once hidden away in cloth bags, I use hanging tags that are purchased from an office supply store. Each tag has a reinforced hole with a string for attaching to the bag. I write the quilt names in pencil on the tag and pin it to the bag so I can easily read the bag’s contents. I tend to switch quilts from one roll to another over time, so I use pencil to write the information on tags. It's easy to erase pencil and I’m Scottish enough not to write new tag each time I pull a switcher-roo.

Next posting, Hanging Bags for Quilts.

Friday, January 30, 2009

Studio Reorganization

Everyone hates to consider organizing h/her stuff. In the studio environment I believe it’s necessary in order to save time when the intense Creative Mode is engaged. Having to stop and search for supplies, tools and other items will severely hamper the process. I have just completed my studio refurbishing and reorganization, a great accomplishment for the New Year. And, yes, my studio lost body mass in the effort. That’s part of the Ruthlessness I mentioned in the previous posting.
Following the floor plan I prepared, all has been returned to the studio. Five-double stacked shelves contain most of the fabric (see photo below). Three bookshelves hold miscellaneous supplies, and notes books that are used frequently. The sewing machines, the chairs, the workstation and the cutting board are in place. And, most of my quilts are tucked away, either hanging on padded hangers or rolled on padded tubing.
Next posting: Making Tubes for Quilt Storage.


Up grading a studio, no matters its size, has 4 requirements: 1) Determination, 2) Ruthlessness; 3) Organization, and, 4) Planning. The onset not only requires determination but may require some negotiations if you live with another human. The dog doesn’t care as long as you feed him on time. The job is chaotic for some days, if not weeks. I recommend keeping a good bottle of wine and a sense of humor readily available. The rewards at the end of the exercise are highly worthwhile.


Every 5 years I like to conduct review my studio contents, to see what I have, find the supplies I actually use, and get rid of the extraneous. This is a 21-year-old habit from military moves every 2 years and the itch continues to reappear. I now call it Refocusing. The last effort was a consequence of chronic stumbling over boxes of fabric and other creative necessities. I was going to seriously injure myself if I didn’t do something. Fed up, I took everything out of my 12 x 16-foot studio and move it all across the hall. This is where Negotiation is involved because everything was a mess.


In 2008 a new plan was launched. I wanted more, particularly laminate flooring and a better working environment by making better use of my studio space. This was Determination. Everything was sorted & packed into boxes. Some boxes stayed, others went curbside. I determined I hadn’t used this stuff since the last reshuffle, so now, out it goes. No second thoughts, gone, Ruthlessness ruled.


While waiting for the re-painting and the new flooring, I drew up a floor plan-to-scale to figure out the best use of the room. My studio has a closet, plus doors or windows on every wall. Where to place the 5 doubled-stacked fabric shelves, one sewing table & machine, the cutting table, 2 bookshelves, an accessory cabinet, and work station with the 2nd sewing machine? Working it out on paper is highly recommended before one has to actually move furniture into the room. This is the first step of Organization. It makes everything easier because you have a Plan.